Python+Flask+Blueprintを使ったAPIサーバ構築 ③ 〜ユニットテスト実施方法編〜
プログラムを作成する上でユニットテストをどうするかは重要な観点です。
本記事では、Python + Flask + Blueprintの環境でどのようにユニットテストを実施するかを共有します。
基本的には、unittestモジュールを使いながらテストを行い、coverageモジュールで、テストカバレッジを測定していく方法となります。
なお、以下の記事のプログラムをベースとしていますので、一緒に参考にしていただければ幸いです。
Python+Flask+Blueprintを使ったAPIサーバ構築 ① 〜ユニットテスト実施方法編〜
Python+Flask+Blueprintを使ったAPIサーバ構築 ② 〜エラーハンドリング編〜
環境
本記事では、以下の環境で動作確認を行いました。
- Mac OSX Mojave(10.14.3)
- Python 3.7.2
- Click==7.0
- Flask==1.0.2
- Flask-Cors==3.0.7
- itsdangerous==1.1.0
- Jinja2==2.10
- MarkupSafe==1.1.1
- six==1.12.0
- Werkzeug==0.15.1
- coverage==4.5.3
applicaiton.pyの修正
冒頭でも述べたとおり、unittestとcoverageモジュールを使って実装していきます。
最初にプログラムを共有したいと思います。
application.pyを以下のように変更します。
import os
import sys
import click
from app import create_app

COV = None
if os.getenv('FLASK_COVERAGE'):
    import coverage
    COV = coverage.coverage(branch=True, include='app/*')
    COV.start()

# print(os.getenv('FLASK_CONFIG'))
app = create_app(os.getenv('FLASK_CONFIG') or 'default')

@app.cli.command()
@click.option('--coverage/--no-coverage', default=False, help='Run tests under code coverage.')
def test(coverage):
    """Run the unit tests."""
    if coverage and not os.getenv('FLASK_COVERAGE'):
        import subprocess
        os.environ['FLASK_COVERAGE'] = '1'
        sys.exit(subprocess.call(sys.argv))

    import unittest
    tests = unittest.TestLoader().discover('tests')
    unittest.TextTestRunner(verbosity=2).run(tests)
    if COV:
        COV.stop()
        COV.save()
        print('Coverage Summary:')
        COV.report()
        basedir = os.path.abspath(os.path.dirname(__file__))
        covdir = os.path.join(basedir, 'tmp/coverage')
        COV.html_report(directory=covdir)
        print('HTML version: file://%s/index.html' % covdir)
        COV.erase()

@app.cli.command()
@click.option('--length', default=25, help='Number of functions to include in the profiler report.')
@click.option('--profile-dir', default=None, help='Directory where profiler data files are saved.')
def profile(length, profile_dir):
    """Start the application under the code profiler."""
    from werkzeug.contrib.profiler import ProfilerMiddleware
    app.wsgi_app = ProfilerMiddleware(app.wsgi_app, restrictions=[length],
                                      profile_dir=profile_dir)
    app.run()
ここで使っているclickというのは、既存のCLI(Command Line Interface、ここでは以下に出てくるflask test --coverageなど)にオプションを追加するモジュールです。
flask test --no-coverageと実行した場合はレポートなし、flask test --coverageと実行した場合はレポート付きで結果を出力するようにしています。
unittest.TestLoader().discover('tests')ではテストケースが格納されるフォルダを指定しています。
テストケースについては後述します。
ここではtestsというフォルダに格納されているテストケースを対象とするため、事前に作成しておきます。
mkdir testsまずは、coverageレポートなしで試してみます。
$ flask test --no-coverage

----------------------------------------------------------------------
Ran 0 tests in 0.000s

OK
テストケースをつくってないので、シンプルですね。
次に、coverageレポート付きで実行してみます。
$ flask test --coverage
----------------------------------------------------------------------
Ran 0 tests in 0.000s
OK
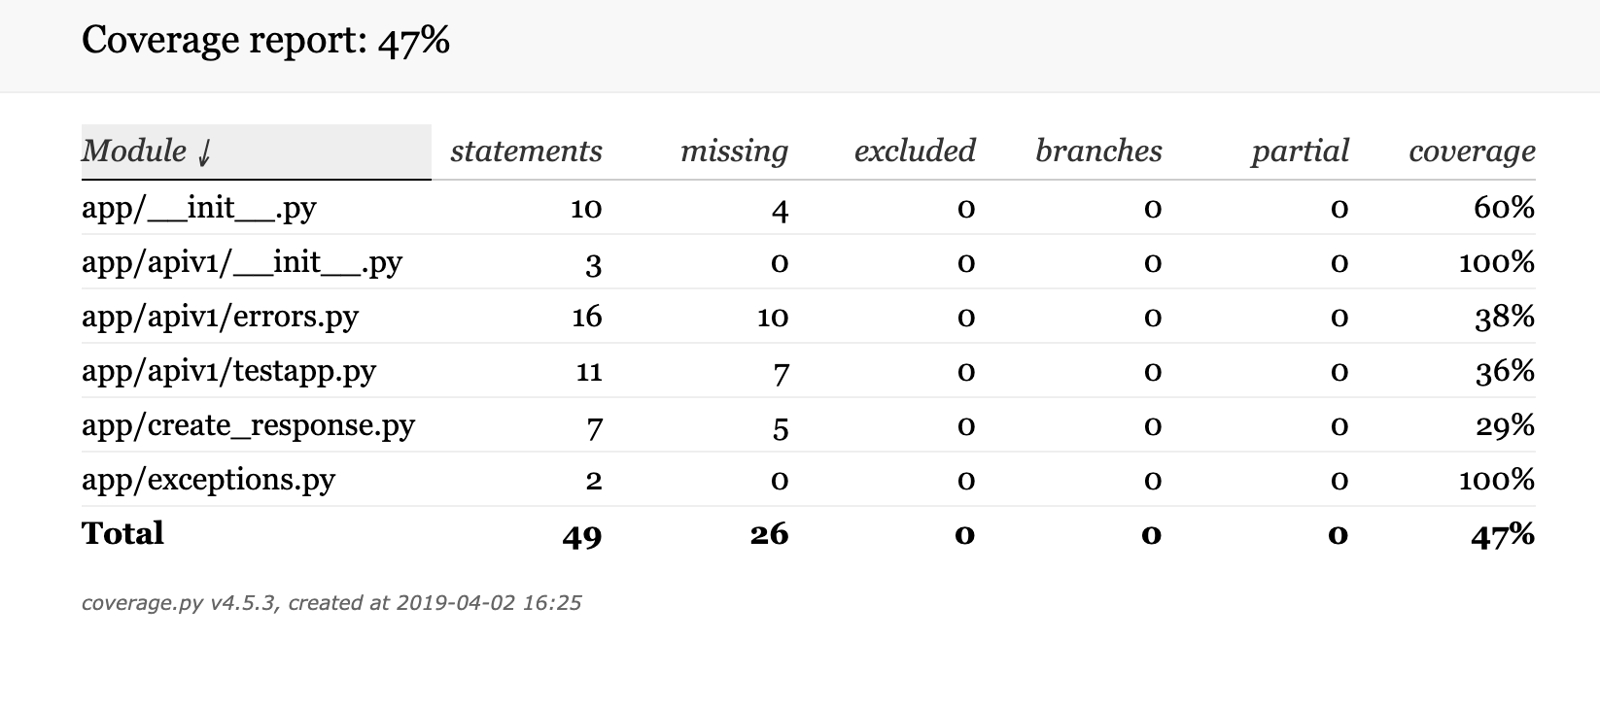
Coverage Summary:
Name Stmts Miss Branch BrPart Cover
----------------------------------------------------------
app/__init__.py 10 4 0 0 60%
app/apiv1/__init__.py 3 0 0 0 100%
app/apiv1/errors.py 16 10 0 0 38%
app/apiv1/testapp.py 11 7 0 0 36%
app/create_response.py 7 5 0 0 29%
app/exceptions.py 2 0 0 0 100%
----------------------------------------------------------
TOTAL 49 26 0 0 47%
HTML version: file:///Users/okayHyatt/flask/tmp/coverage/index.htmlこういうレポートを自動で作ってくれます。
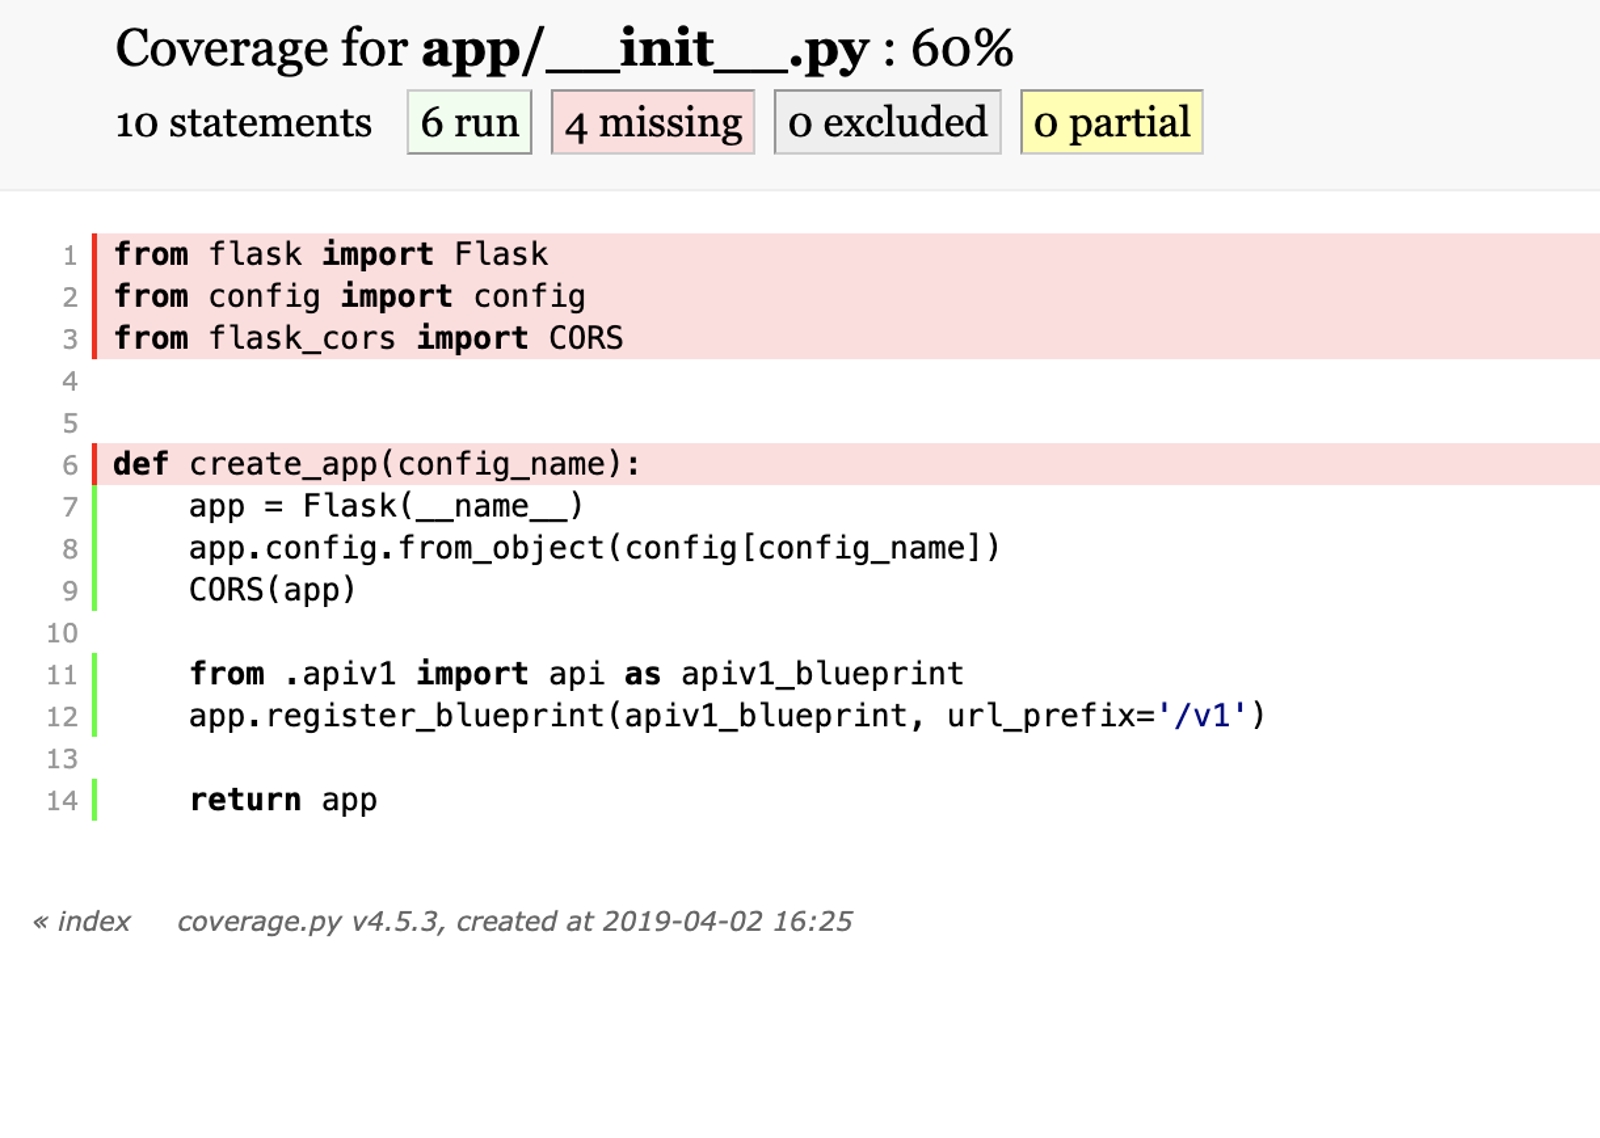
さらにコードの中に入って、どのラインが実行されたかも見られます。
後は実際にテストケースを書いていき、すべてが100%になるのを目指します。
テストケースを書くのは慣れがいります。根気が必要です。
テストケースを書く
testsフォルダの中にtestから始まるファイルがテストケースのファイルとみなされるので、ファイル名には注意が必要です。
まずは、app/test_function.pyをテストケースのやり方を示すために作成します。(これはテストケースではありません)
app/apiv1/test_app.pyを以下のように変更します。
def test():
    return True
from . import api
from flask import render_template, request, current_app, abort
# from app.exceptions import ValidationError
import base64
@api.route('/test', methods=['GET'])
def test():
from app.test_function import test
if not test():
abort(400)
from app.create_response import create_response
content = render_template('ok.json')
# content = render_template('okay.json')
status_code = 200
mimetype = 'application/json'
response = create_response(content, status_code, mimetype)
return response見ての通り、test_function.pyのtestは必ずTrueを返す関数です。
app/apiv1/testapp.pyでは、その関数がFalseになったら400でabortをあげるように変更しました。
このように、想定の挙動はTrueを返す関数ですが、Falseが返った場合を例外処理として記述することはよくあります。
そのときにどのようにテストするかを説明します。
サンプルコードはこちらです。
mport unittest
from app import create_app
from unittest.mock import patch

class TestCase(unittest.TestCase):
    def setUp(self):
        self.app = create_app('testing')
        self.app_context = self.app.app_context()
        self.app_context.push()
        self.client = self.app.test_client()

    def tearDown(self):
        self.app_context.pop()

    def test_function(self):
        with patch('app.test_function.test') as mock_test:
            mock_test.return_value = False
            response = self.client.get('v1/test')
            # response = self.client.post('v1/test')
            self.assertEqual(response.status_code, 400)
setUpはテストのためのクライアントを作成する処理で、tearDownは終了する処理です。
大事なのはtest_functionで、ここでpatchモジュールを使って、app/apiv1/testapp.py内の関数の返り値を変更しています。
その上でself.client.get('v1/test')でGETリクエストを生成し、self.assertEqual(response.status_code, 200)で期待するステータスコードとなっているかをチェックする仕組みとなっています。
この関数の返り値を変更できるということを知っておくことは、テストする際にとても重要です。
基本的にはこのやり方で、coverageレポートの結果が100%になるように、テストケースをひたすら書いていきます。
先にも述べましたが、根気が必要です。
おわり
私自身は、このテストケースの作成の仕方に慣れるのに時間がとてもかかりました。ググってもあまりヒントはありませんでした。
この記事を読んでくれている方が、すんなりテストのやり方を理解できたなら、大変嬉しいです。